Wednesday 29 March 2017

HELP MY BLADE IS TEARING MY PAPER!

HELP MY BLADE IS TEARING MY PAPER!

WHAT NOW?  HOW DO I FIX IT?

I have been asked this a few times this week by different people.  There is nothing more frustrating than having to cut invites or anything for that matter and your paper is ripping and chewing your paper.

Well today I will share a tip with you that I learnt and no it's not fool proof but for me and majority of the ladies having this problem it has worked for.

I got the following message yesterday on Facebook and a similar message posted to another group and my personal page earlier in the week:-

"Hi this is a question for Liane Van Harn please help...my Silhouette is chewing my paper. Placed in a new blade, used a fine brush to brush away any maybe little paper snips, mat is not too sticky. I am using washi tape to hold edges in place....grrrr...blade setting is correct according to Silhouette cardstock. I am double cutting....want to cry."


Does this sound familiar?  To a lot of us I know we have had this but don't fear I will share a trick that I find works 99% of the time.

It's ALL in the settings!

First of all, at the tip of your cutting blade, there is a white cap.  Remove the cap by turning it anti-clockwise and then give it a good blow or use a tweezer to get the paper out.  A lot of the time we will have fibre or bits of paper that bung up the blade, stopping the blade from rotating like it should and this will without a doubt tear your paper even if you stick to the setting below.


When cutting CARDSTOCK I generally ALWAYS use the following setting, my reason for that is that most of the time I am cutting textured cardstock and the cardstock is made up of fibers so when the blade cuts it is having to go through the layers that make up the paper.

Paper: Cardstock
Blade: 3
Speed: 10
Thickness: 33
Double cut: yes
Line segment overcut: on
Start ext: 0.1
End ext: 0.1

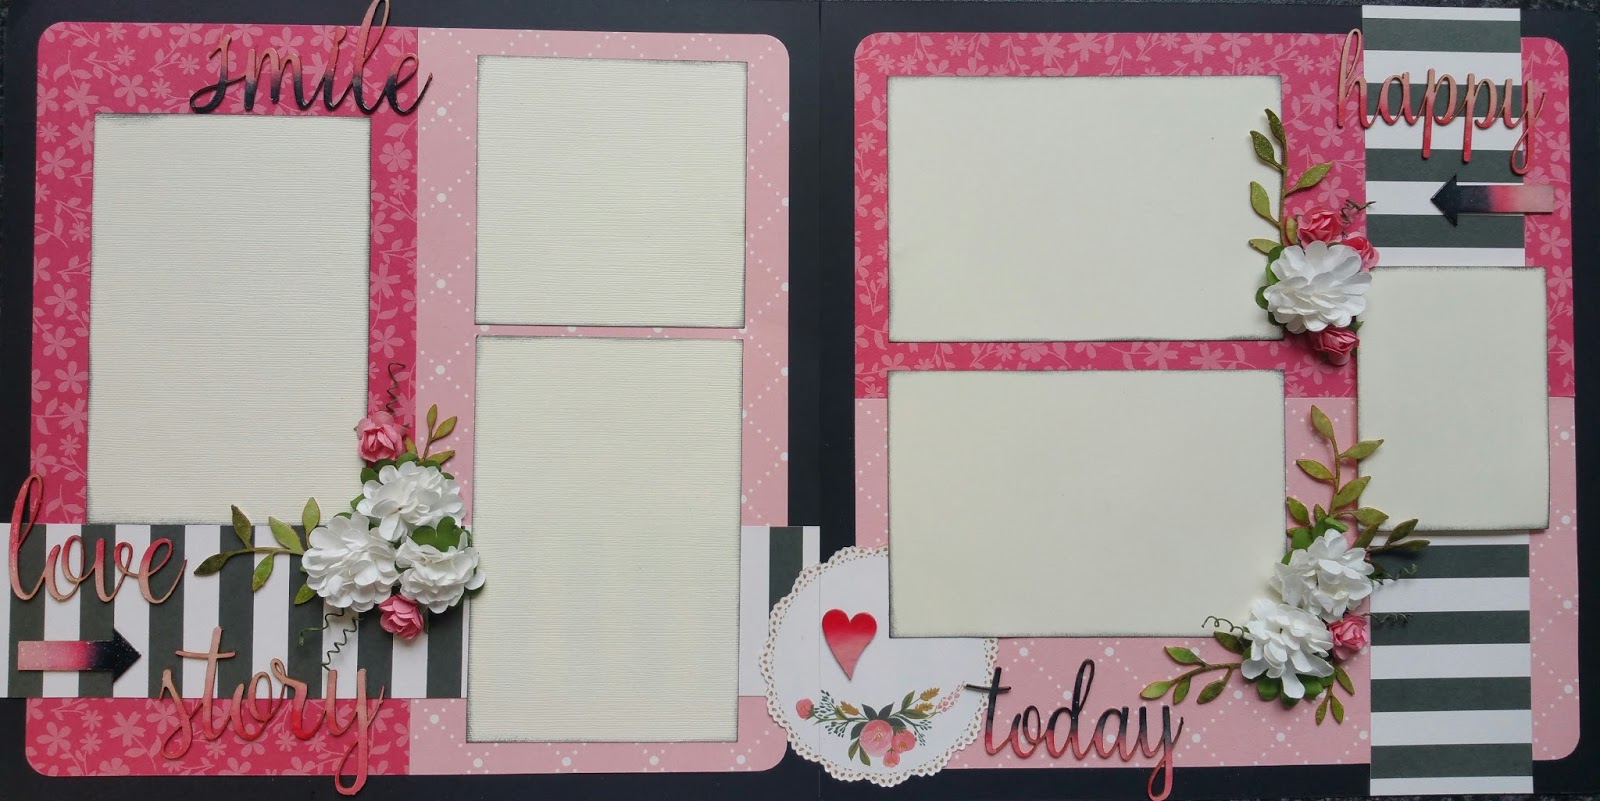
(see image below, as I would cut something like the rose card below)


Now I know what you thinking!

Speed: 10 are you crazy?  No actually my thoughts on this is when cutting a detailed image and you slow your speed down the blade is dragging and if there is a nip it will drag the nip into a big tear.

Thickness: 10 - This is not cast in stone, it depends on what cardstock you are using but the textured cardstock most of us get in our Scrapbook shops in South Africa I find this the best.  If you using a smooth cardstock you can lower this

Double cut: yes - Once again I use this for the textured cardstock so that if the blade missed a double layer of fiber on the first round it will get in on the second time round.  You don't have to double cut for a smooth cardstock that you would generally use if you making invites.  But then that depends totally on the thickness

Line segment overcut: On - This is an amazing feature that not a lot of people use.  What this feature does is starts cutting at 0.1 mm before the actual cut line and ends at 0.1 mm after the cut line.  So this STOPS all those nasty corners from being ripped as its not turning on the point.  
In other words if you cutting a triangle, you will get a pointed triangle, not a rounded tip triangle.

I hope this makes sense and that next time you will try this, it's worked for me and it's worked for the two ladies this week that were ready to throw there machines or cry.

Till next time
Liane 
xoxo


Wednesday 22 March 2017

10 getting started tips for Sihouette Cameo Beginners

SILHOUETTE CAMEO BEGINNERS: 10 TIPS 

Today we are focusing on all the beginners that purchased machines RECENTLY and some of which are to scared to take the machine out the box....we have Melisa from Silhouette school helping you out...


SILHOUETTE CAMEO BEGINNERS: 10 TIPS FOR GETTING STARTED WITH YOUR FIRST CUT

If you want to avoid being one of those Silhouette CAMEO beginners who leaves their Silhouette 
cutting machine in the box for days or weeks or months or years (yes, years!) because they don't know 
where to start....allow me!


http://www.silhouetteschoolblog.com/2016/12/silhouette-cameo-beginners-getting-started.htmlClick here to see the full post

Till next week

Liane 
xxx

Wednesday 15 March 2017

USING THE REPLICATE TOOL TO MAKE FLOWERS (Designer Edition required)

Today, we have a some more designing techniques for you to play with using your Silhoutte software.

Firstly, I need to give the credit of the tutorial idea regarding moving the centre of rotation point to one of my amazing students that attended one of my many classes.  Mariaan, recently purchased a Silhoutte machine and received a free class with me as part of her bundle, but I must say Mariaan, was my most advanced, beginners ever!  So this tutorial is thanks to Mariaan finding out about moving the "Centre of rotation"...Thank you for sharing this with me Mariaan.

So now let the fun begin...

Firstly in order to create the flower petals like this you would need the upgraded version of the Silhouette software called "Designer Edition" as the Centre of rotation is only visable on that edition and not the standard software that you get free with your machine.

CLICK ON THE PICTURES BELOW TO MAKE THEM BIGGER


To draw the petal shape, you click on the the drawing icon circles in red on the left hand side that is in a figure of "8" shape. 


Some might say, but if I select my petal I don't have the centre of rotation point visable & how do I fix it?  This is a quick fix.

When you have your software program open in front of you in the bottom right hand corner you will see a gear.  If you click on the gear a "PREFERENCE" window opens up. 

Now Click on "DEFAULTS" > tick "SHOW CENTRE OF ROTATION" > apply

Now you should see the circle in the middle, being the centre of rotation.


In this example, I rotated 3 copies, your can rotate five copies to get a totally different flower.


Once you have cut the flowers...decorate as desired.

I played with the Tim Holtz Distress Oxide inks to colour my petals


Till next week.

xoxo
Liane


Wednesday 8 March 2017

SILHOUETTE STUDIO V4: 6 REASONS NOT TO UPGDATE...YET

SILHOUETTE STUDIO V4: 6 REASONS NOT TO UPGDATE...YET


I came across this post yesterday from Melissa @ Silhouette School in the USA and thought it was too important not to share with you today...

Melissa, tests new versions of the Silhouette before they are released to us and so when she is giving us 6 reasons not to update ... yet I think we should listen.

Please click on the link below and read what she has to say.

Thank you Melissa for allowing feeding us with so much info...you amazing.


Till next week
Liane

Sunday 5 March 2017

New Scrapbook Kits releasing this week

Here are 2 of my new kits that I am releasing at Beautiful Scrapbooks this week.

I don't have the costing yet as I need the shop to do that, but if you are interested, please email ada@beautifulscrapbooks.co.za and myself at lianevharn@gmail.com so we can secure your kit or quote you when the costing has been done.

YOU CAN FIND ME UNDER THE "PALMS" - you and me: wild, barefoot, and FREE


SMILE, LOVE STORY, HAPPY, TODAY


Happy shopping, till next time

xoxo
L


Wednesday 1 March 2017

How to design a LACE card from scratch

So a few weeks ago I was asked how to create a lace card/pocket, so after hours and hours of fiddling and even emailing Melissa from "Silhouette School" in America, I finally got it right.

I have to say this was a bit of a brain teaser, and sleepless nights for both Melissa and I but when the penny dropped on me this morning I was like no way that's actually so easy...we often tend to over think things and make it difficult but generally in the Silhouette program it is easy it's us that make it complicated.

So I thought I would show you a step by step tutorial on how to design a LACE card from scratch.


The first step is to draw a rectangle the size you would like the card to be "unfolded", in this instance it is 8 x 6".  

To size the rectangle I used the "SCALE" icon highlighted in blue above to size it to the size I wanted.  Remember to un-tick the "Lock Aspect" to size it to the exact size you want otherwise it will size it in proportion to how you drew the rectangle in the first place.

The next step is to create the slant in the card:

1.  Start by double clicking on the rectangle and you will get 4 black dots, one in each corner.  


 2. Now hold your mouse over the dot in the top right hand corner until you see the pointer change and then drag the to down 4" then release.  You will notice at this point in time I am working on the grid because I want to keep the lines straight and the grid lines can help you with this.
3.  Now go to the centre of the card (You will see the little round circle in the middle pointing to the centre), but now you need to click on the line to create another black dot and then drag that upwards to straighten out the line so that when the Silhouette machine cuts the line it will be straight.


The next few step, take some playing around, but to start with you go to your library and find a rose that you want to use to create the lace effect.  

Now you must select the rose so it has the square around it as above and then right click and click on "release compound path"


You will now notice that the rose has a lot of light squares around each individual cut line of the rose.  However you will notice that the swirls and flourishes are connected to the outside of the rose and in order to get the effect we need at the end we need to separate these pieces.  To do this you will use your knife tool

The knife tool is found on the right hand side toward the bottom.  In the picture below it is highlighted in blue.  

If you look at the screen now you will see the Knife selection has opened up on the right hand side of the screen.  In order to cut these sections apart but to keep the designs closed you need to select "SOLID" and then I swapped between "STRAIGHT" or "CURVE" in terms of the knife.  Now cut along the flourish as per the images below and when you happy click "APPLY SELECTED KNIFE".

You will now notice in the second screen shot below that the flourish is now separated from the outside of the rose.

Repeat this on the flourish on the other end.


Now you will drag the outside of the rose away.  For ease of seeing what I am talking about I coloured the line black that we be dragging away.  That will leave you with 2 flourishes and the inside pieces of the rose.  

Select all the inside pieces of the rose then right click and "MAKE A COMPOUND PATH" so that they are all connected now.

What I would now do is select the flourishes and the inside pieces of the rose and right click "COPY" right click "PASTE" and keep this copied rose to the side for later.

Now you will drag the rose towards the invite outline you drew earlier and if need be rotate the rose slightly to position how you want it.  (To rotate, click on the image and where you see the green dot, hold your mouse over that and slightly move the mouse and you will see the image rotate).

Now using the rose and flourish you "COPIED & PASTED", copy and paste another one keeping the original one as you will need to copy and paste a few of them through out the process.

With the 2nd copied rose and flourish fill the line with the rose image careful not to overlap any of the lines and if need be cut off sections of the flourishes to fill in the last gap.  To do that use the knife tool again as explained previously.

Now fill the right hand side of the card using the rose and flourishes.  You will see in the 3rd image below how I filled it.  I didn't to all the way to the bottom or right hand side in case you wanted to stick it down to make a pocket and the 2nd reason being for stability.

Now that it is filled to your liking with no pieces overlapping select all the rose pieces on the right hand side of the card then right click and "MAKE A COMPOUND PATH".


 Now that you have got all the rose pieces joined together.  Click on them and then click on the top "OFFSET" icon highlight in blue and make the distance about 0.080 and click apply.


Now click on the inside pieces of the rose and drag them off to the side.  You should only be left with the card frame and the offset with all it's little pieces.

We don't need the little pieces so you can delete them. To delete you can either use the eraser or alternatively click on the offset section, right click and "RELEASE COMPOUND PATH" then click on all the pieces that you don't want and delete.


Now you should just be left with the cluster of the roses in the grey area and the bits and bobs I was using.

Now select both the outer invite and the offset then right click and "WELD"

After you have welded you will now be left with the image below....I know I know...believe it or not we are almost done.

Now drag the roses cluster from the grey area back onto the working surface and position it inside the offset section.

Now lastly I added my score line.  I did this by selecting the straight line icon on the left hand side which is highlighted in blue and then holding the "SHIFT" button down whilst drawing the line I drew a line from the centre of the card to the bottom.  What the "SHIFT" button down is make the line perfectly straight.

Once I had my line I click on the "LINE STYLE" icon at the top and choose the perforated line style so that it only perforates when it cuts to create a fold line.

Now selected the outer card, rose cluster and the score line, right click and "GROUP".  

Now you can move it to the position on the mat and you are ready to cut.

Remember to set your cut settings to the desired paper that you will be using and when it is finished cutting be gentle as it is a delicate lace card and can tear easily if not handled with care.

Here is the finished card, ready to be made into a pocket if I wanted.  


I hope you enjoyed this tutorial and I would love to see what you design.  Until next time.

Liane