Wednesday, 1 March 2017

How to design a LACE card from scratch

So a few weeks ago I was asked how to create a lace card/pocket, so after hours and hours of fiddling and even emailing Melissa from "Silhouette School" in America, I finally got it right.

I have to say this was a bit of a brain teaser, and sleepless nights for both Melissa and I but when the penny dropped on me this morning I was like no way that's actually so easy...we often tend to over think things and make it difficult but generally in the Silhouette program it is easy it's us that make it complicated.

So I thought I would show you a step by step tutorial on how to design a LACE card from scratch.


The first step is to draw a rectangle the size you would like the card to be "unfolded", in this instance it is 8 x 6".  

To size the rectangle I used the "SCALE" icon highlighted in blue above to size it to the size I wanted.  Remember to un-tick the "Lock Aspect" to size it to the exact size you want otherwise it will size it in proportion to how you drew the rectangle in the first place.

The next step is to create the slant in the card:

1.  Start by double clicking on the rectangle and you will get 4 black dots, one in each corner.  


 2. Now hold your mouse over the dot in the top right hand corner until you see the pointer change and then drag the to down 4" then release.  You will notice at this point in time I am working on the grid because I want to keep the lines straight and the grid lines can help you with this.
3.  Now go to the centre of the card (You will see the little round circle in the middle pointing to the centre), but now you need to click on the line to create another black dot and then drag that upwards to straighten out the line so that when the Silhouette machine cuts the line it will be straight.


The next few step, take some playing around, but to start with you go to your library and find a rose that you want to use to create the lace effect.  

Now you must select the rose so it has the square around it as above and then right click and click on "release compound path"


You will now notice that the rose has a lot of light squares around each individual cut line of the rose.  However you will notice that the swirls and flourishes are connected to the outside of the rose and in order to get the effect we need at the end we need to separate these pieces.  To do this you will use your knife tool

The knife tool is found on the right hand side toward the bottom.  In the picture below it is highlighted in blue.  

If you look at the screen now you will see the Knife selection has opened up on the right hand side of the screen.  In order to cut these sections apart but to keep the designs closed you need to select "SOLID" and then I swapped between "STRAIGHT" or "CURVE" in terms of the knife.  Now cut along the flourish as per the images below and when you happy click "APPLY SELECTED KNIFE".

You will now notice in the second screen shot below that the flourish is now separated from the outside of the rose.

Repeat this on the flourish on the other end.


Now you will drag the outside of the rose away.  For ease of seeing what I am talking about I coloured the line black that we be dragging away.  That will leave you with 2 flourishes and the inside pieces of the rose.  

Select all the inside pieces of the rose then right click and "MAKE A COMPOUND PATH" so that they are all connected now.

What I would now do is select the flourishes and the inside pieces of the rose and right click "COPY" right click "PASTE" and keep this copied rose to the side for later.

Now you will drag the rose towards the invite outline you drew earlier and if need be rotate the rose slightly to position how you want it.  (To rotate, click on the image and where you see the green dot, hold your mouse over that and slightly move the mouse and you will see the image rotate).

Now using the rose and flourish you "COPIED & PASTED", copy and paste another one keeping the original one as you will need to copy and paste a few of them through out the process.

With the 2nd copied rose and flourish fill the line with the rose image careful not to overlap any of the lines and if need be cut off sections of the flourishes to fill in the last gap.  To do that use the knife tool again as explained previously.

Now fill the right hand side of the card using the rose and flourishes.  You will see in the 3rd image below how I filled it.  I didn't to all the way to the bottom or right hand side in case you wanted to stick it down to make a pocket and the 2nd reason being for stability.

Now that it is filled to your liking with no pieces overlapping select all the rose pieces on the right hand side of the card then right click and "MAKE A COMPOUND PATH".


 Now that you have got all the rose pieces joined together.  Click on them and then click on the top "OFFSET" icon highlight in blue and make the distance about 0.080 and click apply.


Now click on the inside pieces of the rose and drag them off to the side.  You should only be left with the card frame and the offset with all it's little pieces.

We don't need the little pieces so you can delete them. To delete you can either use the eraser or alternatively click on the offset section, right click and "RELEASE COMPOUND PATH" then click on all the pieces that you don't want and delete.
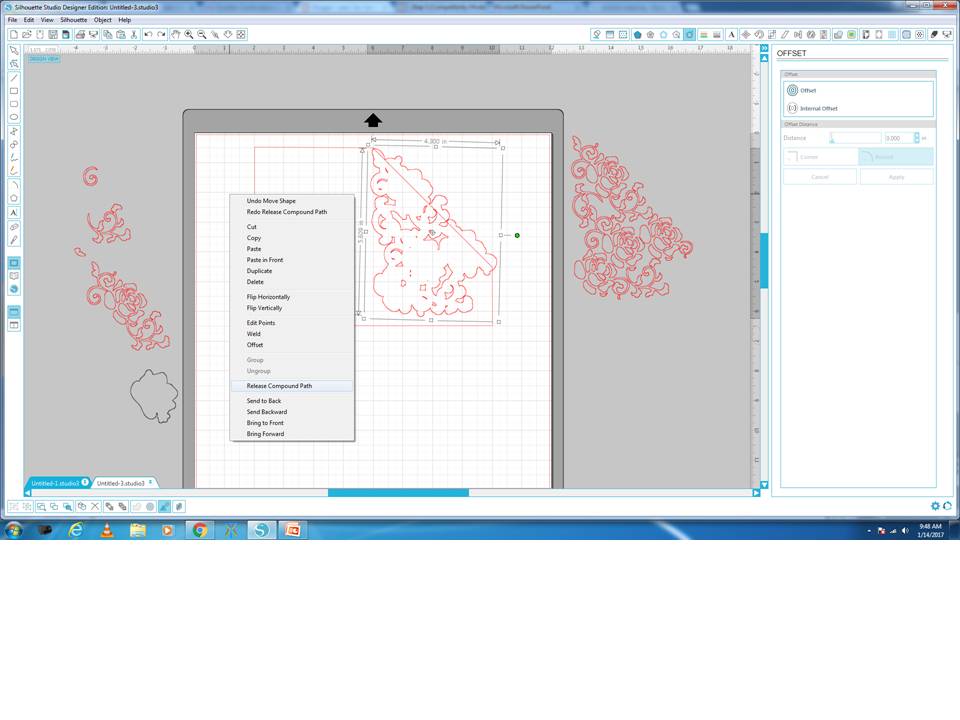

Now you should just be left with the cluster of the roses in the grey area and the bits and bobs I was using.

Now select both the outer invite and the offset then right click and "WELD"

After you have welded you will now be left with the image below....I know I know...believe it or not we are almost done.

Now drag the roses cluster from the grey area back onto the working surface and position it inside the offset section.

Now lastly I added my score line.  I did this by selecting the straight line icon on the left hand side which is highlighted in blue and then holding the "SHIFT" button down whilst drawing the line I drew a line from the centre of the card to the bottom.  What the "SHIFT" button down is make the line perfectly straight.

Once I had my line I click on the "LINE STYLE" icon at the top and choose the perforated line style so that it only perforates when it cuts to create a fold line.

Now selected the outer card, rose cluster and the score line, right click and "GROUP".  

Now you can move it to the position on the mat and you are ready to cut.

Remember to set your cut settings to the desired paper that you will be using and when it is finished cutting be gentle as it is a delicate lace card and can tear easily if not handled with care.

Here is the finished card, ready to be made into a pocket if I wanted.  


I hope you enjoyed this tutorial and I would love to see what you design.  Until next time.

Liane


Wednesday, 22 February 2017

PIXSCAN CALIBRATION PART 2

Last week I showed you how to Calibrate your phone to your software, and this week we will work through actually using the Pixscan mat on your machine to do your fussy cutting.

Step 1:

Using the patterned paper and the images I wanted to cut out, I cut out the cards and stuck them to my pixscan mat.


Step 2: 

I took a photo of the mat with my cell phone and then emailed it to myself (you can also use your USB charging cable and connect it to your computer and transfer the image to your desktop).

Step 3:

Now click on the 3rd icon on the top left, if you hold your mouse over the icon it will say "Open Pixscan image", you will now have the screen below open in front of you.

On the right hand side the Pixscan window will open up, click on the down arrow saying "Import from file > Import pixscan image from file".  Now find where the image is saved on your computer and click open.  (If you emailed it to yourself, download the image and save it on your desktop, then open it up from your desktop)


Step 4:

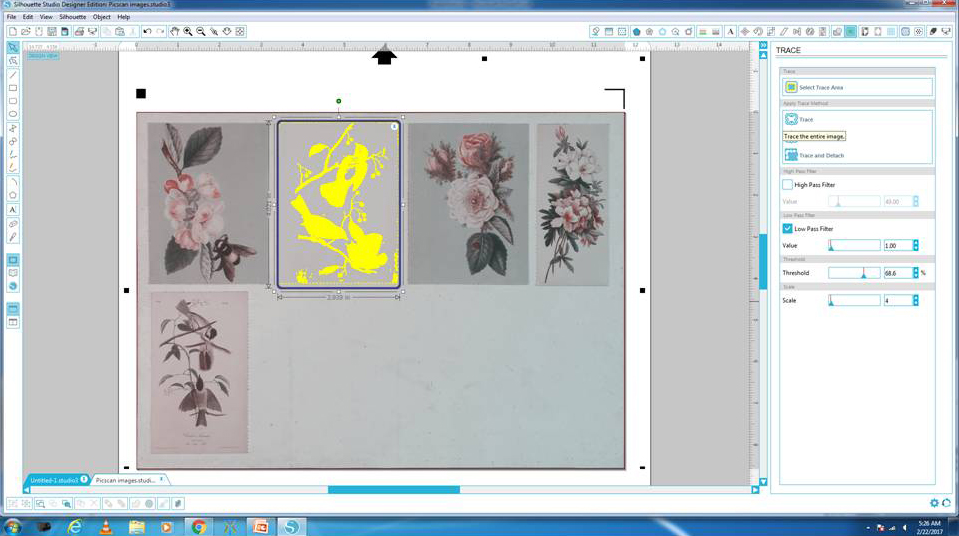
Now you will have the image below.  We are now ready to trace your images.  

NOTE: Do not move the images on the Pixscan mat after you have taken the photo otherwise you will not cut in the right place.


Step 5:

Click on your trace window (if you don't know how to trace please refer to my previous lesson on trace & cut - https://lianevanharn.blogspot.co.za/2017/02/trace-and-cut-for-beginners.html)


Step 6:

I have traced the image as best I could (believe me every single trace is different), this one because of all the colours involved became a bit tricky so I have a bit of cleaning up to do and also fix a few cut lines that were not great.

To do this I clicked on the trace lines > right click > release compound path


Step 6:

You will have now broken the trace lines up into pieces as seen in the image below with all the individual cut lines having there own block.  This now allows me to work on each section individually and delete what I need to.

In order to delete I select what I don't want > right click > delete


Step 7: 

I then zoom in using the "Zoom in" icon with the "+" sign along the top and go to the areas that need fixing, for instance the birds tale


Step 8:

Double click on the lines and you will see all the "edit points" open up as per the image above and below, Now click on the one point that you need to fix so the line goes dark red and then right click > delete, you will notice that that shifts the cut lines and allows you to get a cleaner cut by deleting all the unwanted hooks. 

If you need the cut line there but it just needs to shift in slightly, hold your mouse on the red line and you will see that your mouse pointer changes to a diagonal line with a dot on it, that means you can move that section of the line.  

If you need to curve a section slightly, on the right hand side click on curve, you will notice that the system automatically curves it ever so slightly allowing you to manipulate a bit more.


Compare the image cut line above to the image cut line below and see that the hooks that were traced on the tail have now been straightened out and it follows the actual image and not a shadow.


Step 9:

Fix up what ever else you need to fix and you are now ready to either trace your other images or cut your image out.


As per the image below, I traced the other images, some of which were a bit more complex but I will cover that in an advanced lesson of tracing in a few weeks time.

We are now ready to load the pixscan mat into the Silhouette machine with the arrow pointing towards the machine. 

Choose your blade settings according to the paper you are cutting and cut.


Below is a snippet of the actual layout scrapped after the Silhouette machine did all the cutting for me, the bonus is I also have cut files that I could use some other time as well.

You will notice that the cutting is as good as if you had bout a pack of Kaiser Craft Collectables, at a fraction of the price....we get such beautiful paper, with amazing images on, but not everyone likes to fussy cut...so why not let your machine do the horrible work for you.


I hope you enjoyed the lesson today, and would love to hear back from you, by leaving a comment.

Till next week

Liane
xoxo

Friday, 17 February 2017

SINGLE PAGE KIT - incl Pixscan cut file

My latest single page kit using the Silhouette Pixscan mat to do all the fussy cutting.

Included in this kit is the cutting file to fussy cut the patterns out of the paper...You will be creating your own "Collectables"

You DON'T need the Silhouette machine to do this kit, you will just have a few items to fussy cut.

Now available @ Beautiful Scrapbooks for R183.50
email 
ada@beautifulscrapbooks.co.za 
or call
011 425-4817

to BOOK your kit now.
(Collection of kit or payment on order)


 Images below were cut out on the Silhouette machine, alternative is to cut by hand :-) 


Wednesday, 15 February 2017

PIXSCAN CALIBRATION PART 1 OF 2

I'm sure a lot of you have heard about the Pixscan mat & asked yourself, how do I use it or are basically to scared to attempt it.  Well let me put your mind at ease, it's not difficult and just takes a few minutes to set up.  Once you have done the calibration you are set to open a whole new world with your Silhouette.

The reason I love the Pixscan mat so much is that all that fussy cutting becomes a thing of the past, now isn't that worth it?

So lets get started...

Step 1:

Open your Silhouette software and click on the 3rd icon on the top left hand side as seen in the image below.  If you hold your cursor over the icon it will read "Open Pixscan image".  

On the right hand side you will see the "PIXSCAN" window opens up.


Step 2:

a)  Click on the down arrow "IMPORT FROM FILE"
b)  Click on "CAMERA CALIBRATION"
c)  Click on A4 using the down arrow and then click on the "SHOW CALIBRATION TEST CARD"

You will now see this dotted paper appear as per the image below.

d)  You need to print this on your printer


Step 3:

You now need to take a photo of the printed image using the images below as a guide.

If I can give you a few tips:
1)  Take the photo in a well lit area but don't have any shadows over the page when you taking the photo.
2)  Make sure your camera lense on your cell phone is clean.
3)  Go close to the image and try line up the sides of your cell phone screen with the dotted lines and take the photo as straight on as possible without shaking
4)  Don't have any background area showing

It's sounds like a lot of trouble for just one picture, but believe me it's all worth it.
The image below is a good example of a photo...now we are almost ready to play

Once you have take the photo (I tend to take a few just in case), connect your cell phone to your PC using your USB Cell phone charging cable and transfer the photos you have just take to your desktop (or save it somewhere that is easly found as you need it in the next step), alternatively email to yourself and download those photos onto your computer.


Now go to your Silhouette software and click on the "+" sign as circled in red below and that opens up a pop up screen whereby you can now go and find the picture that you just saved.  i.e: on your desktop or folder that you chose.

Once you have found the picture, click "open" and the Silhouette software will automatically start to Calibrate your cell phone to the software.

If it doesn't like the picture a red screen will open up saying it doesn't like the picture and you must simply try take the photo again or use one of the others that you took.

If it likes it you will see that your cellphone description will show up in the box above the "+" sign.

That's it...that's how easy it is to Calibrate your phone to your Software.

In part 2 of this lesson, we will go into more detail about using your pixscan mat, so be sure to watch out for Part 2 of this lesson.


Pixscan mat available.  On special with this lesson from Liane Van Harn designs
Normal Price R337.45
Now only R290.00 while stock lasts
email Lianevharn@gmail.com
to order yours now.
Proof of payment confirms your order


Wednesday, 8 February 2017

Freebee just for you in time for Valentine's day

Last week I showed you how to trace an image so you can cut it on your Silhouette Machine, so this week I will share a bunch of "Valentines" cut files, I created by tracing various images I found on the internet.


I hope you enjoy creating a masterpiece with these cut files.

Click on the link below to download the FREE files.  Should you battle with the link, copy and paste the link into google.

https://www.dropbox.com/s/j0oxrfa9d089c89/Valentine%20cut%20files.studio3?dl=0


There has been a lot of interest for classes all over South Africa, I have my first roadtrip to Polokwane coming up soon.  We have a few spots open so book TODAY to avoid disappointment:


Then for the Cape Town ladies Snippy Sisters are launching there first workshop soon.

Book directly with them.


Ladies lets support our local talent and teachers.

xoxo
Liane


Wednesday, 1 February 2017

NEW KITS JUST UNPACKED

With NSD last Saturday, I was a busy lady designing kits that were launched.  We have a few left so if you would like to secure yours, please contact Beautiful Scrapbooks asap on 011 425-4817 or ada@beautifulscrapbooks.co.za as stock is limited.
School Snapshots R313.50 (This kit has a pocket for reports or certificates

Family is ... R276.00

Family made with love R235.80


The Beach is my happy place R250.00
xoxo
Liane