Step 1:
Using the patterned paper and the images I wanted to cut out, I cut out the cards and stuck them to my pixscan mat.

Step 2:
I took a photo of the mat with my cell phone and then emailed it to myself (you can also use your USB charging cable and connect it to your computer and transfer the image to your desktop).
Step 3:
Now click on the 3rd icon on the top left, if you hold your mouse over the icon it will say "Open Pixscan image", you will now have the screen below open in front of you.
On the right hand side the Pixscan window will open up, click on the down arrow saying "Import from file > Import pixscan image from file". Now find where the image is saved on your computer and click open. (If you emailed it to yourself, download the image and save it on your desktop, then open it up from your desktop)

Step 4:
Now you will have the image below. We are now ready to trace your images.
NOTE: Do not move the images on the Pixscan mat after you have taken the photo otherwise you will not cut in the right place.

Step 5:
Click on your trace window (if you don't know how to trace please refer to my previous lesson on trace & cut - https://lianevanharn.blogspot.co.za/2017/02/trace-and-cut-for-beginners.html)
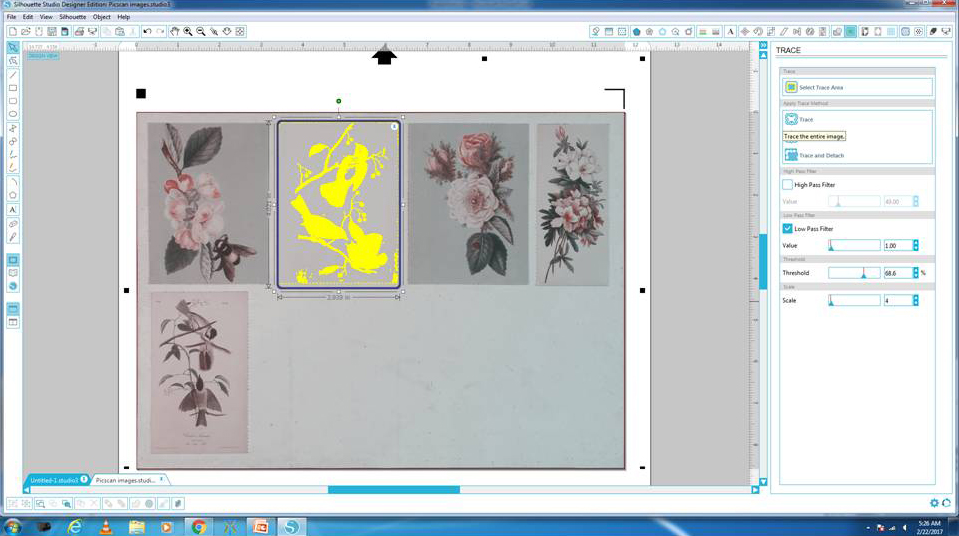
Step 6:
I have traced the image as best I could (believe me every single trace is different), this one because of all the colours involved became a bit tricky so I have a bit of cleaning up to do and also fix a few cut lines that were not great.
To do this I clicked on the trace lines > right click > release compound path

Step 6:
You will have now broken the trace lines up into pieces as seen in the image below with all the individual cut lines having there own block. This now allows me to work on each section individually and delete what I need to.
In order to delete I select what I don't want > right click > delete

Step 7:
I then zoom in using the "Zoom in" icon with the "+" sign along the top and go to the areas that need fixing, for instance the birds tale

Step 8:
Double click on the lines and you will see all the "edit points" open up as per the image above and below, Now click on the one point that you need to fix so the line goes dark red and then right click > delete, you will notice that that shifts the cut lines and allows you to get a cleaner cut by deleting all the unwanted hooks.
If you need the cut line there but it just needs to shift in slightly, hold your mouse on the red line and you will see that your mouse pointer changes to a diagonal line with a dot on it, that means you can move that section of the line.
If you need to curve a section slightly, on the right hand side click on curve, you will notice that the system automatically curves it ever so slightly allowing you to manipulate a bit more.

Compare the image cut line above to the image cut line below and see that the hooks that were traced on the tail have now been straightened out and it follows the actual image and not a shadow.

Step 9:
Fix up what ever else you need to fix and you are now ready to either trace your other images or cut your image out.

As per the image below, I traced the other images, some of which were a bit more complex but I will cover that in an advanced lesson of tracing in a few weeks time.
We are now ready to load the pixscan mat into the Silhouette machine with the arrow pointing towards the machine.
Choose your blade settings according to the paper you are cutting and cut.

Below is a snippet of the actual layout scrapped after the Silhouette machine did all the cutting for me, the bonus is I also have cut files that I could use some other time as well.
You will notice that the cutting is as good as if you had bout a pack of Kaiser Craft Collectables, at a fraction of the price....we get such beautiful paper, with amazing images on, but not everyone likes to fussy cut...so why not let your machine do the horrible work for you.


I hope you enjoyed the lesson today, and would love to hear back from you, by leaving a comment.
Till next week
Liane
xoxo
No comments:
Post a Comment